2023-06-28

Updating First Person Camera in OpenGL 2.0 ES

This is my first exercise learning OpenGL 2.0 ES in Android.  I would like to share my experience of integrating with SensorManager to give a "First Person Camera View".

SensorManager.getRotationMatrix will return a Rotation matrix which can transform a vector from the device coordinate system to the world's coordinate system.  Although documentation states that this matrix is ready to be used by OpenGL ES, I have overlooked some important points initially

  1. This matrix is row-major, unlike the OpenGL matrix which is column major
  2. During the openGL rendering, the rotation matrix is "from the world coordinates to the device coordinates.
  3. Therefore luckily, the inverse of the matrix is to be used.  But Rotation matrix has characteristics that to transpose it effective give the inverse.  To transpose also means to swap the column major to row major.  Therefore the rotation matrix can be used without manipulation at all when passing to OpenGL
  4. But I have still omitted another point, which I will say later on.

To pass the Rotation matrix from SensorManager to OpenGL, it can be as follows:

  1. inside onSensorChanged method, capture the matrix via SensorManager.getRotationMatrix.  If the result is true, pass it to the SurfaceView class.  (I find that there are cases indeed the result can be false and the Rotation Matrix contains all zeros!)
  2. then the SurfaceView class cascades the matrix  to the Render class and first a requestRender()
  3. in onDrawFrame method of the Renderer class, this matrix can be used to populate the Model matrix directly (without any transpose logic)

Then using the phone to pan/tilt/roll, then OpenGL can render the image correctly.

But I have not yet said how to handle camera forward movement scenario.

In OpenGL, the viewMatrix is populated by the Matrix.setLookAtM method.  As a convention, I have set

eye = (0, 0, 0) // origin

center = (0, 0, 1) // looking to z axis 

up = (0, 1, 0) // y axis

So, at first thought, changing the origin of the "First Person Camera" can simply update the viewMatrix with a new eye coordinates.  However, there are two disadvantages

  1. convention is to change the model Matrix as a whole (with other logic, say, rotation)
  2. I also use the model matrix to render multiple some objects and so I am happy to keep eye origin unchanged in the view Matrix

To move forward effectively changes the origin by incrementing z.  Since we need to first translate-then-rotate, we need to translate the (inverse of rotation matrix) times (0, 0, 1)

For a rotation matrix of

r11 r12 r13
r21 r22 r23
r31 r32 r33

its inverse (or transpose) is

r11 r21 r31
r12 r22 r32
r13 r23 r33

multiplying the z unit vector becomes

r31
r32
r33

For a row major resprsentation, it is the 2nd, 6th, 10th elements in the 4x4 matrix.

So actually I need to translate the model matrix by (-r[2], -r[6], -r[10])

This is the lesson I have learnt.


2022-03-31

Unix MQ: System V vs. Posix implementations

For inter-process communication, one of the tools is message queue.  Some tutorial can be found in tutorialspoint

I am an old fashion guy and therefore in Unix, I have been using System V MQ for a long time. (see tutorial in systutorials)

But in fact, there is also the other Posix implementation.  You can visit wikipedia for a brief description of the two.  A tutorial for the Posix can be found in systutorials

Recently I have a project to implement MQ for a server and multiple clients and try to study the feasibility of using Posix MQ.  However to my disappointment, the Posix implementation lacks a very useful feature in System V implementation, viz: mtype (aka message type), which  can serve different usages: it can be used to further separate sub-queues for say, different clients, or different message priority, because it has the following logic:

  • If it is 0, then the first message in the queue is read.
  • If it is greater than 0, then the first message in the queue of that type is read
  • If it is less than 0, then the first message in the queue with the lowest type less than or equal to the absolute value will be read.

But in the Posix implementation, only the priority usage remains.

Back to my case, I only need to implement two MQs, one MQ is to send to the server and the other is to send to the clients.

For the server, it can set mtype to 0 and then can read  the messages from all clients.

For the clients, I can set mtype to a positive number (corresponding to the client unique ID) and then each client can use the same queue to read the messages destined to it.

This is great!

2021-10-04

Internet Radio Player on Raspberry Pi

I still remember the day I started to make an android app for my mother-in-law to listen to internet radio because the place she lived received has poor FM radio broadcast signal.  Why I needed to bother to code an app instead of using an off-the-shelf app is because my old mother-in-law is not versatile enough to play with the andriod UI.  So my app is simply there is power on / power charge, it will start automatically.  When there is no power charge, it will sleep automatically after a certain time-out (via BroadcastReceiver to receive the POWER_CONNECTED and POWER_DISCONECTED events).  So she could simply use a power switch to turn on/off the app.

I used the MediaPlayer android object as the main part of the program.  Yes, it is an easy-to-use object and I do not need to bother to handle the http download, mp3 conversion and sound playing logic.  However, problem occurred when I use the app on site because there is transient (but now always) wifi stability problem.  It seems that MediaPlayer object cannot handle the error in a very graceful manner. (I have already handled all the documented states of the object and capture all the exceptions!).  When there was wifi problem, the app simply played on sound (and then forever).  So far, what I could do is to ask my mother-in-law to switch off the charging and wait a few minutes and turn-on the charger again.  But this was really inconvenient.

Years passed now and my mother-in-law has also died.  But the idea of how to build a robust internet radio app is always in my mind.  Recently I still to study the idea to build this app on my Raspberry Pi (which is has already wifi, and a built-in ear-phone jack (not of hifi quality but okay for internet radio).

This time, I nearly started from scratch (not really).  I use libcurl for the http protocol, libmpg123 for the mp3 conversion and alsa (libasound) for the sound playing.  For libcurl, I used the multi interface because it allows time-out handling.  The program codes are not long after all these logic implementation.  Most of the time I have spent is on the studying of API and choose the right ones because I have not used these libraries before).  The name of the only C file is 'pi_rthk.c' because it played RTHK.  I have also tested the problem for other internet radio URL's.


/*
File: pi_rthk.c
Description: an internet radio to play RTHK
Libraries : curl, mpg123 asound
Findings:
(1) uses multi interface for curl to handle timeout (although there is only one easy handle
(2) the work at the curl write callback handler will affect the throughput.  But curl will increases the number of bytes per call. 
(3) my original idea is to use mpg123_decode() but it turns out that mpg123_decode() keeps on complaining MPG123_NEED_MORE. Even changing to use mpg123_feed() and mpg123_read() is in vain.  Finally after reading some blog, I manage to use mpg123_decode_frame()
(4) some discussion thread on mpg123
https://sourceforge.net/p/mpg123/mailman/mpg123-users/thread/BANLkTik8wkAQ9gVtzAPeij6jZ1SuK0%2BLWA%40mail.gmail.com/#msg27415661
(5) after I start the coding, I find there is a simlary program by Johnny Huang
http://hzqtc.github.io/2012/05/play-mp3-with-libmpg123-and-libao.html
The only difference is he uses libao and I use libasound
*/

#include <stdio.h>
#include <string.h>
#include <sys/time.h>
#include <unistd.h>
#include <signal.h>
#include <ctype.h>

#include <curl/curl.h>
#include <mpg123.h>
#include <alsa/asoundlib.h>

mpg123_handle *mh = NULL;
snd_pcm_t *playback_handle;
CURL *http_handle;
CURLM *multi_handle;
int channels;

void str_trim (char *s)
// triming the trailing white spaces by modifying the original string
{
int m = strlen (s);
int i;
for (i=m-1; i>=0; i--) {
  if (isspace(s[i]))
    s[i] = '\0';
  else
    break;
  }
} // str_trim();

void str_toupper (char *s)
// converting the string to upper case by modify ihe original string
{
int m = strlen (s);
if (m == 0)
  return;
int i;
for (i=0; i<m; i++)
  s[i] = toupper (s[i]);
} // str_toupper ()

static size_t curl_header_callback (char *buffer, size_t size, size_t nitems, void *userdata)
{
size_t numbytes = size * nitems;

// fprintf(stderr, "HTTP HEADER : %.*s", numbytes, buffer);

char b[1000];
char name[1000];
char value[1000];
memcpy (b, buffer, (numbytes>999) ? 999 : numbytes);
b[numbytes]= '\0';
str_trim (b);
// fprintf (stderr, "after triming [%s]\n", b);
fprintf (stderr, "HTTP HEADER : [%s]\n", b);
str_toupper (b);
// fprintf (stderr, "after toupper [%s]\n", b);
sscanf (b, "%s %s", name, value);
if (strcmp (name, "CONTENT-TYPE:") == 0) {
  if (strcmp (value, "AUDIO/MPEG") != 0) {
    fprintf (stderr, "ERROR: Content-Type (%s) is NOT \"audio/mpeg\"\n", name);
    return 0; // error exit
    }
  }
return numbytes;
}

size_t curl_write_callback_handler (char *ptr, size_t size, size_t nmemb, void *userdata)
{
size_t decoded_bytes;
long int rate;
int encoding;
int err = MPG123_OK;
int frames;

fprintf (stderr, "inside write_callback() receiving %d bytes\n", nmemb);

err = mpg123_feed (mh, ptr, nmemb); // size is always 1 in curl
if (err != MPG123_OK) {
  fprintf(stderr, "ERROR: mpg123_feed fails... %s", mpg123_plain_strerror(err));
  return 0;
  }
fprintf (stderr, "mpg123_feed() ok\n");

 off_t frame_offset;
 unsigned char *audio;
 do {
   err = mpg123_decode_frame (mh, &frame_offset, &audio, &decoded_bytes);
   switch (err) {
     case MPG123_NEW_FORMAT:
       fprintf (stderr, "mpg123_decode_frame returns MPG123_NEW_FORMAT\n");
       if (MPG123_OK != mpg123_getformat(mh, &rate, &channels, &encoding)) {
         fprintf (stderr, "ERROR: mpg123_getformat fails\n");
         return 0;
         }
       fprintf (stderr, "rate = %ld channels = %d encoding = %d\n", rate, channels, encoding);
       if (encoding == MPG123_ENC_SIGNED_16)
         fprintf (stderr, "encoding is signed 16 bit\n");
       if (MPG123_OK != mpg123_format (mh, rate, channels, encoding)) {
         fprintf (stderr, "mpg123_format fails\n");
         return 0;
         }
       fprintf (stderr, "mpg123_format ok\n");
       if ((err = snd_pcm_set_params(playback_handle,
             SND_PCM_FORMAT_S16_LE,
             SND_PCM_ACCESS_RW_INTERLEAVED,
             channels,
             (unsigned int) rate,
             0, /* disallow resampling */
             500000)) < 0) {   /* 0.5sec */
         fprintf(stderr, "ERROR: snd_pcm_set_params() fails: %s\n", snd_strerror(err));
         return 0;
         }
       fprintf (stderr, "snd_pcm_set_params() ok\n");
       break;
     case MPG123_NEED_MORE:
       fprintf (stderr, "mpg123_decode_frame returns MPG123_NEED_MORE with decoded_bytes = %d\n", decoded_bytes);
       break;
     case MPG123_OK :
       fprintf (stderr, "mpg123_decode_frame() returns MPG124_OK with decoded_bytes = %d\n", decoded_bytes);
       if (decoded_bytes > 0) {
         frames = decoded_bytes / 2 / channels; // 2 == 16(sample size) / 8(bits per byte)
         // frames = decoded_bytes * 8 / 2 / 16;
         err = snd_pcm_writei (playback_handle, audio, frames);
         if (err != frames) {
           fprintf (stderr, "write to audio interface failed (%s)\n",
             snd_strerror (err));
           return 0;
           }
         }
       break;
     default: 
       fprintf(stderr, "ERROR: mpg123_read fails... %s", mpg123_plain_strerror(err));
       break;
     } // switch
   } while (decoded_bytes > 0);

return nmemb;

} // curl_write_callback_handler()

void radio_clean_up()
{
mpg123_delete (mh);
snd_pcm_close (playback_handle);
curl_multi_remove_handle(multi_handle, http_handle);
curl_easy_cleanup(http_handle);
curl_multi_cleanup(multi_handle);
curl_global_cleanup();
}

void default_signal_handler(int signal_number)
{
  fprintf (stderr, "Inside %s\n", __func__);
  radio_clean_up();
  fprintf (stderr, "Program exits\n");
  exit(0);
}

int main(void)
{

signal(SIGINT, default_signal_handler);

int err;

if ((err = snd_pcm_open (&playback_handle, "default", SND_PCM_STREAM_PLAYBACK, 0)) < 0) {
  fprintf (stderr, "cannot open audio device (%s)\n", snd_strerror (err));
  return 1;
  }

curl_version_info_data *d = curl_version_info (CURLVERSION_NOW);
fprintf (stderr, "curl version %s\n", d->version);

fprintf (stderr, "mpg123 version %d\n", MPG123_API_VERSION);

fprintf (stderr, "ALSA version %s\n", snd_asoundlib_version());

#if MPG123_API_VERSION < 46
err = mpg123_init();
if (err != MPG123_OK) {
  fprintf (stderr, "ERROR: mpg123_init() fails... %s\n", mpg123_plain_strerror(err));
  return 0;
  }
#endif

mh = mpg123_new(NULL, &err);
if (mh  == NULL) {
  fprintf(stderr, "ERROR: mpg123_new fails... %s", mpg123_plain_strerror(err));
  return 0;
  }

err = mpg123_open_feed (mh);
if (err != MPG123_OK) {
  fprintf(stderr, "ERROR: mpg123_open_feed fails... %s", mpg123_plain_strerror(err));
  return 0;
  }
fprintf (stderr, "mpg123_open_feed ok\n");

int still_running = 1; /* keep number of running handles */

curl_global_init(CURL_GLOBAL_DEFAULT);

http_handle = curl_easy_init();

curl_easy_setopt (http_handle, CURLOPT_URL, "http://stm.rthk.hk/radio1");

curl_easy_setopt (http_handle, CURLOPT_HEADERFUNCTION, curl_header_callback);

curl_easy_setopt (http_handle, CURLOPT_WRITEFUNCTION, curl_write_callback_handler);
 
multi_handle = curl_multi_init();

curl_multi_add_handle(multi_handle, http_handle);

do {
  CURLMcode mc = curl_multi_perform(multi_handle, &still_running);
  if(!mc)
/* since the version of libcurl in Raspberry Pi is quite old */
#if LIBCURL_VERSION_NUM >= 0x076600
    mc = curl_multi_poll(multi_handle, NULL, 0, 1000, NULL);
#else
    mc = curl_multi_wait (multi_handle, NULL, 0, 1000, NULL);
#endif

  if (mc) {
    fprintf(stderr, "curl_multi_poll() or curl_multi_wait() failed, code %d.\n", (int)mc);
    break;
    }

  } while (still_running);

fprintf (stderr, "Program exits\n");
return 0;
} // main


2021-09-11

A YUV420 image viewer on Raspberry Pi: my first GTK program

Recently, I revived some camera programming on my old Raspberry Pi 3 (see link).  Since it generates many YUV (actually YUV420) image formats and I found there is no viewer on Raspberry Pi (maybe I am ignorant), I start to code one myself.  (By the way, I have been using a Windows version found in sourceforge.net)

While YUV format is good for image data processing, it lacks many meta data.  The dimensions cannot be derived from the file.  Worst still, if there is any programming error, I simply got a corrupted image.

Frankly speaking, I have no graphical programming experience on Linux.  After some information gathering, I try to use GTK.  Luckily the learning curve is not deep.

The following are my codes

/*
File: yuv420viewer.c
Date: 2021-09-11
By: waihungmm
Description: A YUV420 image viewer based on GTK
Environment: originally compiler on Raspberry Pi
*/

#include <gtk/gtk.h>
#include <stdio.h>
#include <stdlib.h>
#include <string.h>
#include <unistd.h>
#include <sys/stat.h>

void on_destroy (GtkWidget *widget G_GNUC_UNUSED, gpointer user_data G_GNUC_UNUSED)
{
gtk_main_quit ();
}

int main (int argc, char *argv[])
{
char *filename;
FILE *f;
struct stat st;
int width = -1;
int height = -1;
int stride_width;
int stride_height;
int yuv_file_size;
unsigned char *rgb_buffer;
unsigned char *yuv_buffer;
unsigned char *u_buffer;
unsigned char *v_buffer;

int my_opt_err = 0;
int opt;
while ((opt = getopt (argc, argv, ":h:w:")) != -1) {
  // the first character of optstring is : to use silent error reporting mode
  switch (opt) {
    case 'w':
      width = atoi (optarg);
      if (width <= 0) {
        printf ("Error: Invalid width parameter (%s)\n", optarg);
        my_opt_err = 1;
      }
      break;
    case 'h':
      height = atoi (optarg);
      if (height <= 0) {
        printf ("Error: Invalid height parameter (%s)\n", optarg);
        my_opt_err = 1; 
        }
      break;
    case '?':
      if (optopt == 'h') {
        printf ("option -h needs a value\n");
        my_opt_err = 1;
        }
      else if (optopt == 'w') {
        printf ("option -w needs a value\n");
        my_opt_err = 1;
        }
      else {
        printf ("unknown option %c\n", optopt);
        my_opt_err = 1;
        }
      break;
    } // switch
  } // while

if (width == -1) {
  printf ("Error: no width paramter is given\n");
  my_opt_err = 1;
  }

if (height == -1) {
  printf ("Error: no height paramter is given\n");
  my_opt_err = 1;
  }

if (argc == optind) {
  printf ("Error: no filename is given\n");
  my_opt_err = 1;
  }
else if (optind == (argc-1))
  filename = argv[optind];
else {
  printf ("Error: too many filenames are given\n");
  my_opt_err = 1;
  }

if (my_opt_err) {
  printf ("Usage: %s -w yuv_width -h yuv_height yuv_filename\n", argv[0]);
  return 0;
  }

if (stat(filename, &st) == -1) {
  printf ("Error: Cannot access file \"%s\"\n", filename);
  return 0;
  }

if ((width % 32) == 0)
  stride_width = width;
else
  stride_width = ((width / 32) + 1) * 32;

if ((height % 16) == 0)
  stride_height = height;
else
  stride_height = ((height / 16) + 1) * 16;

yuv_file_size = st.st_size;
if (yuv_file_size != (stride_width * stride_height * 3 / 2)) {
  printf ("Error: filesize (%d) is not 1.5 multiple of stride width (%d) x stride height (%d)\n", yuv_file_size, stride_width, stride_height);
  return 0;
  }

rgb_buffer = (unsigned char*)malloc(width * height * 3);
yuv_buffer = (unsigned char*)malloc(stride_width * stride_height * 3 / 2);
// set offset to access the u data and v data
u_buffer = yuv_buffer + stride_width * stride_height;
v_buffer = u_buffer + (stride_width * stride_height) / 4;

f = fopen (filename, "r");
if (f == NULL) {
  printf ("Error: cannot open file \"%s\"\n", filename);
  return 0;
  }

int length = fread (yuv_buffer, 1, yuv_file_size, f);
fclose (f);

if (length != yuv_file_size) {
  printf ("Error: cannot read the whole file \"%s\" successfully\n", filename);
  }

int i,j;
int y, u, v;
int r, g, b;
for (i=0; i< height; i++) {
 for (j=0; j< width; j++) {
  y = yuv_buffer[i*stride_width+j];
  u = u_buffer[(i/2)*(stride_width/2)+(j/2)];
  v = v_buffer[(i/2)*(stride_width/2)+(j/2)];
  r = (1164 * (y-16) + 1596 * (v-128)) / 1000;
  g = (1164 * (y-16) - 391 * (u-128) - 813 * (v-128)) / 1000;
  b = (1164 * (y-16) + 2018 * (u-128) ) / 1000;;
  if (r < 0) r = 0;
  if (g < 0) g = 0;
  if (b < 0) b = 0;
  if (r > 255) r = 255;
  if (g > 255) g = 255;
  if (b > 255) b = 255;
  rgb_buffer [3*(i*width+j) ] = r;
  rgb_buffer [3*(i*width+j)+1] = g;
  rgb_buffer [3*(i*width+j)+2] = b;
  }
 }

// the following are the gtk stuff

GdkPixbuf *pixbuf;
GtkWidget *image;
gtk_init (&argc, &argv);
GtkWidget *win = gtk_window_new (GTK_WINDOW_TOPLEVEL);
pixbuf = gdk_pixbuf_new_from_data (rgb_buffer, GDK_COLORSPACE_RGB, FALSE, 8, width, height, (width)*3, NULL, NULL);
gtk_window_set_title (GTK_WINDOW (win), filename);

int screen_width = gdk_screen_width();
int screen_height = gdk_screen_height();

if ((width > screen_width) || (height > screen_height))
gtk_widget_set_size_request (win, screen_width-10, screen_height-75);
else
gtk_widget_set_size_request (win, width+10, height+10);

GtkWidget *scrolled_window;
scrolled_window = gtk_scrolled_window_new (NULL, NULL);
gtk_container_set_border_width (GTK_CONTAINER (scrolled_window), 1);

gtk_scrolled_window_set_policy (GTK_SCROLLED_WINDOW (scrolled_window), GTK_POLICY_AUTOMATIC, GTK_POLICY_AUTOMATIC);

image = gtk_image_new_from_pixbuf (pixbuf);

gtk_scrolled_window_add_with_viewport (GTK_SCROLLED_WINDOW (scrolled_window), image);

gtk_container_add(GTK_CONTAINER (win), scrolled_window);

gtk_widget_show_all (win);
g_signal_connect (win, "destroy", G_CALLBACK(on_destroy), NULL);
gtk_main ();
free (yuv_buffer);
free (rgb_buffer);
return 0;
}

The compilation step is simply as follows:
gcc `pkg-config --cflags --libs gtk+-2.0` -o yuv420viewer yuv420viewer.c

The following is a sample screen dump


2021-08-26

Annotation of my minimal mmal programming experience

 To make further supplementary notes of my previous post Jottings on Raspberry Pi mmal programming

  1. my original idea is to have real time manipulation of the video data, I have abandoned to usage of encoder component
  2. in my example of a frame size of 320x240 pixels, I can achieve a 30 frame-per-second on yuv format even with codes to dump the yuv data onto disk.
  3. I find the the boc_host_init(), which documentation says it is called first before any GPU (vc_*) calls can be made, is not necessary in my mmal program
  4. most of the mmal API is defined by a header/value structure, which has the header labelled as hdr and defined by designated enumeration values to define the the subsequent functionality of the API

2021-08-25

Jottings on Raspberry Pi mmal programming

Reference: Multi-Media Abstraction Layer (MMAL). Draft Version 0.1

MMAL entities

  • components
  • ports
  • buffer

component

  • use mmal_component_create API to create, return MMAL_COMPONENT_T

port

  • created automatically by component (and does not need separate create API)
  • but the format of the input port must be set by client (using mmal_port_format_commit API)
  • output port format will be automatically set (provided there is sufficient information)
  • checked by whether output format is MMAL_ENCODING_UNKNOWN 

buffer

  • used for exchange data (but not contain data directly but instead contain a pointer
  • data can be allocated outside MMAL 
  • buffer header are allocated from pool and are "reference counted" - call  mmal_buffer_header_release to drop refcount
  • "after" commiting the format of port, a pool of buffer header should be created
  • queue (MMAL_QUEUE_T) is a facility to process buffer header.  Callback triggered when three is available data in queue

The following is my minimal mmal program with reference to tasanakorn's rpi-mmal-demo project


/* minimal API to make pi camera work */
#include <stdio.h>
#include <unistd.h>
#include <assert.h>

#include "bcm_host.h"
#include "interface/mmal/mmal.h"
#include "interface/mmal/util/mmal_default_components.h"
#include "interface/mmal/util/mmal_connection.h"

#define DEFAULT_WIDTH 320
#define DEFAULT_HEIGHT 240
#define DEFAULT_VIDEO_FPS 30

typedef struct {
    MMAL_COMPONENT_T *camera;
    MMAL_COMPONENT_T *preview;
    MMAL_PORT_T *camera_preview_port;
    MMAL_PORT_T *camera_video_port;
    MMAL_PORT_T *camera_still_port;
    MMAL_POOL_T *camera_video_port_pool;
} PORT_USERDATA;

static void camera_video_buffer_callback(MMAL_PORT_T *port, MMAL_BUFFER_HEADER_T *buffer)
{
static int frame_count = 0;
static struct timespec t1;
struct timespec t2;

if (frame_count == 0)
   clock_gettime(CLOCK_MONOTONIC, &t1);

frame_count++;

PORT_USERDATA *userdata = (PORT_USERDATA *) port->userdata;
MMAL_POOL_T *pool = userdata->camera_video_port_pool;

mmal_buffer_header_mem_lock(buffer);

// put codes to manipulate buffer here

mmal_buffer_header_mem_unlock(buffer);

// calculate frame rate
if (frame_count % 10 == 0) {
   clock_gettime(CLOCK_MONOTONIC, &t2);
   float d = (t2.tv_sec + t2.tv_nsec / 1000000000.0) - (t1.tv_sec + t1.tv_nsec / 1000000000.0);
   float fps = 0.0;

   if (d > 0)
     fps = frame_count / d;
   else
     fps = frame_count;

   printf("Frame = %d,  Framerate = %.1f fps \n", frame_count, fps);
}

mmal_buffer_header_release(buffer);

// and send one back to the port (if still open)
if (port->is_enabled) {
  MMAL_STATUS_T status;
  MMAL_BUFFER_HEADER_T *new_buffer;
  new_buffer = mmal_queue_get(pool->queue);

  if (new_buffer)
         status = mmal_port_send_buffer(port, new_buffer);

  if (!new_buffer || status != MMAL_SUCCESS)
    printf("Error: Unable to return a buffer to the video port\n");

  }

} // camera_video_buffer_callback()

int fill_port_buffer(MMAL_PORT_T *port, MMAL_POOL_T *pool)
{
int q;
int num = mmal_queue_length(pool->queue);

for (q = 0; q < num; q++)
  {
  MMAL_BUFFER_HEADER_T *buffer = mmal_queue_get(pool->queue);
  if (!buffer)
    printf("Unable to get a required buffer %d from pool queue\n", q);

  if (mmal_port_send_buffer(port, buffer) != MMAL_SUCCESS)
    printf("Unable to send a buffer to port (%d)\n", q);
  } // for
} // fill_port_buffer


int main (void)
{
// I find bcm_host_int is not necessary although documentation says it is called first before any GPU (vc_*) calls can be made
// bcm_host_init();

MMAL_STATUS_T status;
PORT_USERDATA userdata;
MMAL_PARAMETER_CAMERA_CONFIG_T cam_config;

status = mmal_component_create(MMAL_COMPONENT_DEFAULT_CAMERA, &(userdata.camera));
if (status != MMAL_SUCCESS) {
   printf("Error: create camera %x\n", status);
   goto closing;
   }
else
  printf ("Calling mmal_component_create() to create camera component is successful\n");

assert (userdata.camera != NULL);

userdata.camera_preview_port = userdata.camera->output[0];
userdata.camera_video_port   = userdata.camera->output[1];
userdata.camera_still_port   = userdata.camera->output[2];

cam_config.hdr.id = MMAL_PARAMETER_CAMERA_CONFIG;
cam_config.hdr.size = sizeof (cam_config);
cam_config.max_stills_w = DEFAULT_WIDTH,
cam_config.max_stills_h = DEFAULT_HEIGHT,
cam_config.stills_yuv422 = 0,
cam_config.one_shot_stills = 1,
cam_config.max_preview_video_w = DEFAULT_WIDTH,
cam_config.max_preview_video_h = DEFAULT_HEIGHT,
cam_config.num_preview_video_frames = 3,
cam_config.stills_capture_circular_buffer_height = 0,
cam_config.fast_preview_resume = 0,
cam_config.use_stc_timestamp = MMAL_PARAM_TIMESTAMP_MODE_RESET_STC;

printf ("Calling  mmal_port_parameter_set() at line %d\n", __LINE__);
status = mmal_port_parameter_set(userdata.camera->control, &cam_config.hdr);
if (status != MMAL_SUCCESS) {
  printf("Could not select camera : error %d", status);
  goto closing;  
  }
else
  printf ("Calling mmal_port_parameter_set() for Camera config is successful\n");

// Setup camera preview port format
userdata.camera_preview_port->format->encoding = MMAL_ENCODING_OPAQUE;
userdata.camera_preview_port->format->encoding_variant = MMAL_ENCODING_I420;
userdata.camera_preview_port->format->es->video.width = DEFAULT_WIDTH;
userdata.camera_preview_port->format->es->video.height = DEFAULT_HEIGHT;
userdata.camera_preview_port->format->es->video.crop.x = 0;
userdata.camera_preview_port->format->es->video.crop.y = 0;
userdata.camera_preview_port->format->es->video.crop.width = DEFAULT_WIDTH;
userdata.camera_preview_port->format->es->video.crop.height = DEFAULT_HEIGHT;

status = mmal_port_format_commit(userdata.camera_preview_port);
if (status != MMAL_SUCCESS) {
  printf("Error: camera viewfinder format couldn't be set\n");
  goto closing;  
  }
else
  printf ("Calling mmal_port_format_commit() for preview port is successful\n");

userdata.camera_video_port->format->encoding = MMAL_ENCODING_I420;
userdata.camera_video_port->format->encoding_variant = MMAL_ENCODING_I420;
userdata.camera_video_port->format->es->video.width = DEFAULT_WIDTH;
userdata.camera_video_port->format->es->video.height = DEFAULT_HEIGHT;
userdata.camera_video_port->format->es->video.crop.x = 0;
userdata.camera_video_port->format->es->video.crop.y = 0;
userdata.camera_video_port->format->es->video.crop.width = DEFAULT_WIDTH;
userdata.camera_video_port->format->es->video.crop.height = DEFAULT_HEIGHT;
userdata.camera_video_port->format->es->video.frame_rate.num = DEFAULT_VIDEO_FPS;
userdata.camera_video_port->format->es->video.frame_rate.den = 1;

userdata.camera_video_port->buffer_size = userdata.camera_video_port->format->es->video.width * userdata.camera_video_port->format->es->video.height * 12 / 8;
userdata.camera_video_port->buffer_num = 2;

status = mmal_port_format_commit(userdata.camera_video_port);
if (status != MMAL_SUCCESS) {
  printf("Error: unable to commit camera video port format (%u)\n", status);
  goto closing;  
  }
else
  printf ("Calling mmal_port_format_commit for video port is successful\n");

// now create buffer pool

userdata.camera_video_port_pool = (MMAL_POOL_T *) mmal_port_pool_create(userdata.camera_video_port, userdata.camera_video_port->buffer_num, userdata.camera_video_port->buffer_size);

userdata.camera_video_port->userdata = (struct MMAL_PORT_USERDATA_T *) &userdata;

status = mmal_port_enable(userdata.camera_video_port, camera_video_buffer_callback);
if (status != MMAL_SUCCESS) {
  printf("Error: unable to enable camera video port (%u)\n", status);
  goto closing;  
  }
else
  printf ("Calling mmal_port_enable() for video port is successful\n");

status = mmal_component_enable(userdata.camera);
if (status != MMAL_SUCCESS) {
  printf("Error: unable to enable camera (%u)\n", status);
  goto closing;  
  }
else
  printf ("Calling mmal_component_enable() for camera component is successful\n");

fill_port_buffer(userdata.camera_video_port, userdata.camera_video_port_pool);

if (mmal_port_parameter_set_boolean(userdata.camera_video_port, MMAL_PARAMETER_CAPTURE, 1) != MMAL_SUCCESS)
  printf("Failed to start capture\n");
else
  printf ("Successful to call mmal_port_parameter_set_boolean() to start capture\n");

// do not set up encoder

// now set up preview

MMAL_COMPONENT_T *preview = 0;
MMAL_CONNECTION_T *camera_preview_connection = 0;
MMAL_PORT_T *preview_input_port;

status = mmal_component_create(MMAL_COMPONENT_DEFAULT_VIDEO_RENDERER, &preview);
if (status != MMAL_SUCCESS) {
  printf("Error: unable to create preview (%u)\n", status);
  goto closing;  
  }
else
  printf ("Calling mmal_component_create() to create preview component is successful\n");


if (!preview->input_num)
  {
  printf("No input ports found on component");
  goto closing;  
  }

preview_input_port = preview->input[0];

MMAL_RECT_T previewWindow;   // Destination rectangle for the preview window
previewWindow.x = 100;
previewWindow.y = 100;
previewWindow.width = 320;
previewWindow.height = 240;

MMAL_DISPLAYREGION_T param;
param.hdr.id = MMAL_PARAMETER_DISPLAYREGION;
param.hdr.size = sizeof (MMAL_DISPLAYREGION_T);
param.set = MMAL_DISPLAY_SET_LAYER;
param.layer = 2;
param.set |= MMAL_DISPLAY_SET_ALPHA;
param.alpha = 255;

param.set |= (MMAL_DISPLAY_SET_DEST_RECT | MMAL_DISPLAY_SET_FULLSCREEN);
param.fullscreen = 0;
param.dest_rect = previewWindow;

status = mmal_port_parameter_set(preview_input_port, &param.hdr);
if (status != MMAL_SUCCESS && status != MMAL_ENOSYS) {
  printf("Error: unable to set preview port parameters (%u)\n", status);
  goto closing;  
  }
else
  printf ("Calling mmal_port_parameter_set() on preview input port is successful\n");

status = mmal_connection_create(&camera_preview_connection,
   userdata.camera_preview_port,
   preview_input_port,
   MMAL_CONNECTION_FLAG_TUNNELLING | MMAL_CONNECTION_FLAG_ALLOCATION_ON_INPUT);
if (status != MMAL_SUCCESS) {
  printf("Error: unable to create connection (%u)\n", status);
  goto closing;  
  }
else
  printf ("Calling mmal_connection_create() preview connection is successful\n");

status = mmal_connection_enable(camera_preview_connection);
if (status != MMAL_SUCCESS) {
  printf("Error: unable to enable connection (%u)\n", status);
  goto closing;  
  }
else
  printf ("Calling mmal_connection_enable() on preview connection is successful\n");

printf ("Press Control-C to abort\n");

while (1)
  sleep (1);

closing:

if (userdata.camera_preview_port && userdata.camera_preview_port->is_enabled)
  mmal_port_disable (userdata.camera_preview_port);

if (userdata.camera)
  mmal_component_destroy (userdata.camera);


} // main

2021-08-24

Initializing a structure in C language

#include <stdio.h>
typedef struct sub_struct {
int field1;
int field2;
int field3;
} SUB_STRUCT;

typedef struct my_struct {
SUB_STRUCT field1;
int field2;
int field3;
int field4;
} MY_STRUCT;

main() {

MY_STRUCT var =
{
.field1 = {
   .field1=1 ,
   .field3=3 },
.field2 = 2,
.field4 = 4
};
printf ("var.field1.field1 = %d\n", var.field1.field1);
printf ("var.field1.field2 = %d\n", var.field1.field2);
printf ("var.field1.field3 = %d\n", var.field1.field3);
printf ("var.field2 = %d\n", var.field2);
printf ("var.field3 = %d\n", var.field3);
printf ("var.field4 = %d\n", var.field4);
}

var.field1.field1 = 1
var.field1.field2 = 0
var.field1.field3 = 3
var.field2 = 2
var.field3 = 0
var.field4 = 4

2021-06-09

Elliptic curve algebra explained in high school maths


I have no formal Computer Science background. Most of my computer knowledge are acquired after graduation. Especially about encryption stuff, this is based on self learning and most level is just up to RSA standard. Recently having some interest on the underlying technologies of Bitcoin, I want to study about Elliptic curve (y2 = x3 + ax + b) because it is used for encryption. However, after viewing some YouTube videos, I still cannot have a better understanding the geometry about it. Some of them are even wrong. The following diagrams are from Wikipedia (red line) and the blue line will define a “binary” operation P+Q = -R


The Youtuber simply stated the following formulae to derive R…

If P = (x1, y1), Q = (x2, y2), R = (x3, y3)

Not satisfied with result, I try to solve the problem (simultaneous equations in two unknowns) using my high school level maths level.

Putting (2) into (1)


which is a simple polynomial of level 3.

High school level maths shows the sum of roots (x1+x2+x3) is the negative coefficient of x2 (i.e. m2). Back to how to calculate m, it is simply

Oh! I finally got the answer!


The Youtuber also stated that for the case P=Q i.e. x1 = x2 and y1 = y2), then


For this case, actually the straight line should be a tangent line touching the elliptic curve at point B. Oh! This needs calculus and I need to cheat by doing some searching on internet. Luckily, some universities do public some tutorial paper on that.

Taking differentiation on y2 = x3 + ax + b

As in the previous case, m2 is still the sum of root (in this case is x1+x2+x3).

Therefore x3 and also be calculated according.

2020-06-07

從慚愧到一點慰藉

由於終於安裝了家居寬頻,所以多聽咗youtube(真喺聽,唔喺睇),我用的裝置是一部android手機接駁藍芽音箱。
但越聽越多很花時間 (youtube真喺好addictive!) 跟住有人話其實是用快速1.5至2倍速度聽youtube。坦白講,我對聲效的認識仍停留在n年前在大學時讀的Digital Signal Processing, 只是識少少Fast Fourier Transform(其實都唔記得晒),仍覺得加速會將聲音變調而唔好聽。
就即管試下…點解android手機嘅youtube無playback speed選項?上網求救,原來只支援android 5或更新的手機(說來慚愧,我部舊手機只是行android 4.4.4)。但是點解google將playback speed logic放在client side而不是server side呢?再上網找資料,原來google在2017年寫過篇blog解釋此功能,仲話甚麼甚麼time stretching,phase vocoder等…(算罷,我投降喇!)不過文章介紹youtube player是用Sonic library來實施variable playback speed。講番效果,其實真喺唔差,沒有雞仔聲。
我平時是用開audacity做音效editing,就看看audacity有無此功能,原本真是有的,快速版是Change Tempo,慢速版(效果好啲)是Sliding Stretch,後者是用Subband Sinusoidal Modeling Synthesis運算法,我試過效果也不錯,總算有點慰藉。

2020-05-17

Zoom來學佛 - 林碧君 (因陀羅網 @ 溫暖人間541期)

疫情影響了很多宗教活動,佛教也不例外,目前法師講經/開示、法會、佛學課程、禪修甚至義工們的互動,很多都改以「Zoom」遙距式舉行。

然而,靠「Zoom」弘法,對傳訊和接收雙方的要求都大幅地提高了— 我們準備好了嗎?

不少機構只是把原來的課程/開示設計原封不動地改為網上直播,兩小時的課就直播兩小時,但沒群眾影響下,觀眾真的可以在電腦前呆坐兩小時嗎?欠缺現場氣氛下,對着顯示屏的專注力和現 場聽課會一樣嗎?如何保證聽課的環境 不會分心?(手機有關嗎?) 就算同樣有中場休息,又如何保證小息完後會繼續?(不少有名的網上教育,例如TED,設計 成片長不超過二十分鐘是有原因的。)

講者的挑戰則更大,除了要學習「網紅式」鏡頭表達技巧外,因為無法從現場的反應中,感受到聽眾的接受 程度及最關心的事,便無法調整講授內容 — 容易流於自說自話。

更重要是,聽眾常覺得網上的開示「必然會」重播,便會想「無須即時同 步聽課,日後有空才看」一而「有空 的一日」,永遠是明日。

From Uncertainty Principle to the Dilemma of Efficiency and Service Quality

Recently, listening to some youtube clips about philosophy triggers my memory of Heisenbery's uncertainty principle learnt in high school:

(standard deviation of position) times (standard deviation of momentum) >= Planck constant / 2

It simply states the more certain of the former implies the more uncertain of the latter.
I nearly forgot. But during work, I more often have to deal with the resource (labour or others) efficiency and customer satisfaction (e.g. wait time). Hey! I remember I have learnt queuing theory for M/M/1 model,

the mean queue time is t = ρ / (1-ρ) where ρ = λ / μ
λ is the rate at which packets arrive at the queue (in packets/second), and
μ is the rate at which packets may be served by the queue (in packets/second)
(sorry I in fact forgot the exact formula but I just copy from Wikipedia)

My main point is this has many similarity with uncertainty principle in the sense that the high efficiency you request, the longer wait time will be resulted.

for efficiency, I can view ρ can serve this role because it is always less than one.

The I redefine inefficiency as λ = 1-ρ, then
t = ρ / (1-ρ) ≈ 1 / (1-ρ) (since ρ≈1)
then t • (1-ρ) ≈ 1 or

t • λ ≈ 1
which is my analogy of the uncertainty principle.

2017-08-03

Raspberry Pi Camera: Most Simple Motion Detection Logic


I want to make my newly purchased Pi as a home surveillance appliance.

My requirements are very simple:

  • it is purely camera based (i.e. no need to install Passive Infrared (PIR) motion sensor)
  • it is still photo based (i.e. not video based)
  • it should not consume too much of my Pi resources (CPU or GPU)
  • it will take photos when it detected image changes
  • the photos will be uploaded to Google Drive

I have checked many resources on internet.  The main stream is to either use opencv (or its derivative SimpleCV) or the Motion package (or even the whole OS with motionEyeOS).  Although some ports are said to utilize the Pi's GPU resources, I notice the performance is still not satisfactory (low resolution or low frame rate).

Considering my case that most of the time, my periodically captured photos are nearly the same, except some lighting changes, noises, clock face changes etc and inspired various projects (e.g. brainflakes  or Sarah Henkens' blog), I devise my motion detection algorithm as follows:

(a) the task will be kicked off by cron

(b) use Pi's command line to capture still picture onto the disk

(c) I will compare the grey-scale of each pixel in consecutive snapshots.  Someone said for RGB domain, using the Green channel for comparison is sufficient.  But Pi also supports YUV output.  The Y channel (luminance) actually is the brightness of each pixel.  Pi's YUV format is YUV420 and the first 2/3 of the file contains the Y data.

(d) if the number of pixels with change in Y (luminance) is greater than a limit, then this photo will be uploaded to Google Drive

(e) the photo will be converted to JPEG before the upload.  I use Imagemagick's convert command to do the job.  Remark: although I take my still picture at maximum resolution 3280x2464, because of the padding (horizontal: multiples of 32, vertical: multiples of 16), the resultant YUV file is of resolution of 3296x2464.  Since YUV file has no header to indicate the information, I need to specify the figure in the Imagemagick's convert command.

However, I find the major challenge is how to specify limit in step (d).  Therefore I conduct a data analysis of sensitivity of different values of change of Y.


As shown in the above graph, the bottom group of lines are those image with no motion detection (the variation is due to background noise).  The upper group of lines (with lighter colour) are those image with motion detection.  Finally I choose the following:
  • Change of Y: 50
  • Count: 50
However, after running for several days, I find that the camera is too sensitive that it trigger the capture even though I saw there is no noticeable object movement on the image.  Of course I have tried to adjust the above detection threshold using trial-and-error.  But as you know, I am only struggling between the dilemma of false positive and false negative scenario.  If I decrease the sensitivity significantly , then I may miss a capture if there is real object movement.

Finally I find the false detection scenarios are mainly due to too reasons:
  • overall ambient background brightness change due to sunshine (although it is a indoor environment)
  • there a portion of screen due to a white window curtain, which has a high value of Y and its changes of Y will affect the overall counter significantly
My original logic is to just look into a single point of "Change of Y", assuming that it is on a global applicable trend.  But it is not necessarily true.  Therefore to emphasize the object detection, I adopt a an accumulative approach, by counting the number of pixels with changes greater than a value.  For the second issue, my original logic use absolute logic and therefore a pixel changing from Y=1 to Y=11 has the same effect with another pixel changing from Y=245 to Y=255.  But from a subjective point, I think a relative change is more appropriate.

The following is effect after the change:


After the adjustment,, it can be observed that:

  1. the vertical axis interception is always 8121344, which is the total number of pixel of the image
  2. the lines of the background image (those in lighter color) are nearly straight line (with vertical axis in log scale)
  3. the lines of the image with motion (those in darker color) have a more horizontal line segment

I then choose the following criteria:
  • Relative Change of Y: 100
  • Accumulative count of pixels: 10000
Finally about the details of implementation.  I have only coded two programs.  The first is a C program called yuv_ardiff (viz. yuv's accumulative and relative diff) for step (c) above. [Remark: I am still learning python].  The second is a bash script will implement the whole logic.
The following are the source codes:

/***********
File        : yuv_ardiff.c
Description : To compare the Y space of two yuv files for motion detection
              Accumulative Relative Diff
Usage       : yuv_ardiff file1.yuv file2.yuv
Modification History
2017-08-01  Initial version
2017-08-06  Change counter to accumulative
2017-08-08  Use Relative ratio
*/

#include <stdio.h>
#include <stdlib.h>
#include <sys/stat.h>

int main (int argc, char **argv)
{
struct stat st;
int file1_size, file2_size;
int y_size;
int i;
FILE *fp1;
FILE *fp2;
unsigned char byte1, byte2;
int diff, sum, rdiff;;
int count[256];

if (argc != 3) {
  printf ("Usage: %s file1.yuv file2.yuv\n", argv[0]);
  return 0;
  }


if (stat(argv[1], &st) == -1) {
  printf ("Error: Cannot get the file size of %s\n", argv[1]);
  return 0;
  }
file1_size = st.st_size;
/* printf ("%d\n", file1_size); */

if (stat(argv[2], &st) == -1) {
  printf ("Error: Cannot get the file size of %s\n", argv[2]);
  return 0;
  }
file2_size = st.st_size;
/* printf ("%d\n", file2_size); */

if (file1_size != file2_size) {
  printf ("Error: File size of %s (%d) is not equal to %s (%d)\n", argv[1], file1_size, argv[2], file2_size);
  return 0;
  }

/* The first 2/3 are Y, next 1/6 is U and last 1/6 is V */
if ((file1_size % (3*16*16)) != 0) { /* actual is 1.5 * 32 * 16 */
  printf ("Error: File size (%d) should be multiple of 1.5*32*16\n", file1_size);
  return 0;
  }


fp1 = fopen (argv[1], "r");
if (fp1 == NULL) {
  printf ("Error: Cannot open file (%s)\n", argv[1]);
  return 0;
  }

fp2 = fopen (argv[2], "r");
if (fp2 == NULL) {
  printf ("Error: Cannot open file (%s)\n", argv[2]);
  return 0;
  }

y_size = file1_size * 2 / 3;
/* printf ("y_size = %d\n", y_size); */
for (i=0; i<256; i++)
  count[i] = 0;

for (i=0; i< y_size; i++) {
  if (fread (&byte1, 1, 1, fp1) != 1) {
    printf ("Error: Cannot read byte from (%s)\n", argv[1]);
    return 0;
    }
  if (fread (&byte2, 1, 1, fp2) != 1) {
    printf ("Error: Cannot read byte from (%s)\n", argv[2]);
    return 0;
    }

  diff = abs (byte1 - byte2);
  sum = byte1 + byte2;

  if (sum > 0)
    rdiff = (diff * 256) / sum;
  else
    rdiff = 0;

  if (rdiff > 255) {
    printf ("Error: rdiff (%d) is greater than 255\n", rdiff);
    return 0;
    }

  (count[rdiff])++;

  } // for loop

fclose (fp1);
fclose (fp2);

for (i=254; i>=0; i--)
    count[i] += count[i+1];

for (i=0; i<256; i++)
  printf ("%d ", count[i]);
printf ("\n");

return 0;
} // main

=====================================================
#!/bin/bash
# File: pi_camera_motion.sh
cd /home/whc/motion
rm -f last.yuv
if [ -e current.yuv ]; then
mv current.yuv last.yuv
fi
DATE=`date +"%Y%m%d_%H%M%S"`
raspiyuv -n -h 2464 -w 3280 -o current.yuv
if [ -e last.yuv ]; then
yd=`/home/whc/bin/yuv_adiff last.yuv current.yuv`
echo ${DATE} ${yd} >> /home/whc/yuv_ardiff.log
diff_count=`echo ${yd} | awk '{print \$101}'`
if [ "${diff_count}" -gt "10000" ]; then
convert -size "3296x2464" -depth 8 -sampling-factor "4:2:0" yuv:current.yuv pi_photo_${DATE}.jpg
/home/whc/gdrive-linux-rpi upload --parent xxxxxxxxxxxxxxxxxxxxxxxxxx pi_photo_${DATE}.jpg
fi
fi

2017-07-26

Take periodic photos using Pi camera and upload to Google Drive


Taking photos using the Pi camera is easy.  But how to allow remote access of the photo is a headache.  I do not want to Port Forwarding in my router (especially on SSH ports) because I think my Pi is not yet appropriately hardened.  I decide to upload the photos to the cloud.

Google has well-documented API for the Google Drive access.  In particular, I love Petter Rasmussen's gdrive, which is a CLI (command-line-interface) client for many Operating Systems because it is a static binary which does not need external libraries.

I have tried the Windows 64 bit build and the Raspberry Pi build and it works.  For the Windows build, I even try it behind the proxy server of my company and it works after I set up the http_proxy environment variable.

The github page of the gdrive already provides extensive documentation (with examples) and it is easy to adopt.  The following are my major usage:

(1) Initial setup

gdrive about

gdrive will print out a URL.  Using browser to launch the URL and enter the account password, Google will print out a verification code.  I will enter the verification code to the CLI.

There is documentation on Service Account, which is said to make server-to-Google access with password-less access.  But I find that even using the verification code approach, I find gdrive can refresh the token file automatically.  In other words, I only need to input the verification code once.  Therefore I finally do not bother to set up a Service Account.

(2) List File details

gdrive list --query "name = 'file_name_or_folder_name' "

C:\PortableApps\gdrive>gdrive-windows-x64.exe list --query "name = 'PI_PHOTO_00.jpg' "
Id                             Name              Type   Size     Created
xxxxxxxxxxxxxxxxxxxxxxxxxxxx   PI_PHOTO_00.jpg   bin    4.8 MB   2017-07-26 10:00:16

C:\PortableApps\gdrive>gdrive-windows-x64.exe list --query "name = 'pi-photos' "
Id                             Name        Type   Size   Created
xxxxxxxxxxxxxxxxxxxxxxxxxxxx   pi-photos   dir           2017-07-21 19:50:23

(3) List Files inside a folder

gdrive list --query " 'Parent_Folder_Id' in parents"

C:\PortableApps\gdrive>gdrive-windows-x64.exe list --query " '0Bzo1pJKfp9QEdVZFdVV2RTV2RVE' in parents "
Id                             Name              Type   Size     Created
xxxxxxxxxxxxxxxxxxxxxxxxxxxx   PI_PHOTO_35.jpg   bin    4.8 MB   2017-07-26 10:35:12
xxxxxxxxxxxxxxxxxxxxxxxxxxxx   PI_PHOTO_30.jpg   bin    4.7 MB   2017-07-26 10:30:12

(4) Upload File to specified folder

gdrive --parent Parent_Folder_Id Upload_Filename

(5) Delete File

gdrive delete  File_Id

I then start to code my bash script (which will be run by cron periodically) to take photo and then upload the photo.  I use the minute digits to name my photo filename and originally thought that this nomenclature can automatically recycle my photo copies without an explicit housekeeping job.  But I am wrong.  I find Google Drive allow multiple copies of the same filename (even not using the versioning feature) and these multiple copies will be assigned with different File-Id.

Worst still I find gdrive has no direct command to delete a file (or files) by filename.  I need to first list the File_id by the inputted filename and then delete them (if more than one) one-by-one.  The logic is:

gdrive list --no-header --query "name = 'Filename' " | awk '{print $1}' | xargs -n 1 gdrive delete

The xargs command is to ensure the gdrive is executed one-by-one

The following is my script:

#!/bin/bash
# use 00-59 minutes for filename recycling
DATE_MM=$(date +"%M")
cd  /home/pi/photos
raspistill -n -o PI_PHOTO_${DATE_MM}.jpg
# delete duplicated copies at Google drive
/home/pi/gdrive-linux-rpi list --no-header --query "name = 'PI_PHOTO_${DATE_MM}.jpg'" | awk '{print $1}' | xargs -n 1 /home/pi/gdrive-linux-rpi delete
# upload to pi_photos folder at Google Drive
/home/pi/gdrive-linux-rpi upload --parent xxxxxxxxxxxxxxxxxxxxxxxxxxxx --delete PI_PHOTO_${DATE_MM}.jpg

2016-01-07

Using U3 Flash Drive for CDROM emulation


I have an old U3 flash drive, which has only 1G capacity. This kind of a device can mount two drives simultaneously - one is a conventional flash drive (read/write) and one is a CDROM drive (read-only). Usually users does not care the CDROM partition and sometimes even remove it totally to spare more space from the conventional partition.

However, recently triggered by a corporate customer's site requirement that conventional flash drive is disabled but CDROM ia allowed (thanks to its read-only feature), I start to think whether I can re-use my old U3 drive for that purpose.

The first step is to create an ISO file, which should be a well-known idea if you have ever burned a disk. I choose to use InfraRecorder, because it has no embedded commercial ad and has a portable version to save the installation effort. The following screen shots illustrate the steps to build the ISO file.


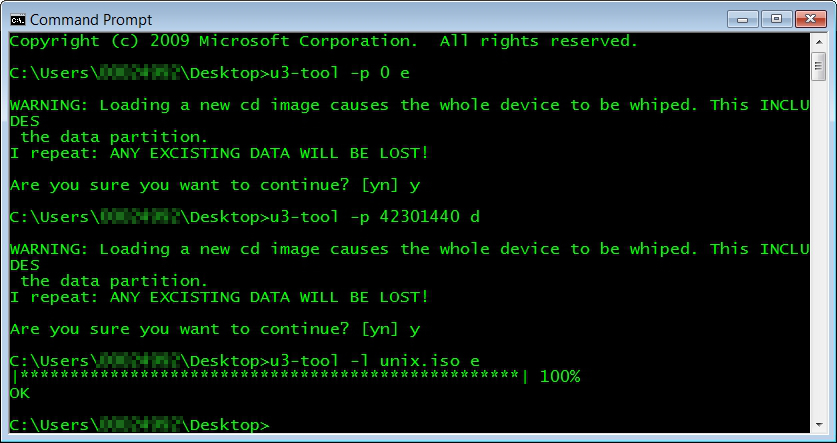
Then I download u3tool from SOURCEFORGE.NET. It is a open source tool to manipulate the U3 disk and I find it also work properly in my 64 bit Windows environment as well. The steps are simple:

(i) create the CDROM partition
u3-tool -p <size-of-iso-file> <driver letter o u3-cdrom-without-colon>
e.g. u3-tool -p 42301440 d

(ii) load the iso file
u3-tool -l <iso-filename>  <driver letter u3-cdrom-without-colon>
e.g. u3-tool -l unix.iso e


Then this CD Drive is shown in Windows Explorer as follows: