2017-08-03

Raspberry Pi Camera: Most Simple Motion Detection Logic


I want to make my newly purchased Pi as a home surveillance appliance.

My requirements are very simple:

  • it is purely camera based (i.e. no need to install Passive Infrared (PIR) motion sensor)
  • it is still photo based (i.e. not video based)
  • it should not consume too much of my Pi resources (CPU or GPU)
  • it will take photos when it detected image changes
  • the photos will be uploaded to Google Drive

I have checked many resources on internet.  The main stream is to either use opencv (or its derivative SimpleCV) or the Motion package (or even the whole OS with motionEyeOS).  Although some ports are said to utilize the Pi's GPU resources, I notice the performance is still not satisfactory (low resolution or low frame rate).

Considering my case that most of the time, my periodically captured photos are nearly the same, except some lighting changes, noises, clock face changes etc and inspired various projects (e.g. brainflakes  or Sarah Henkens' blog), I devise my motion detection algorithm as follows:

(a) the task will be kicked off by cron

(b) use Pi's command line to capture still picture onto the disk

(c) I will compare the grey-scale of each pixel in consecutive snapshots.  Someone said for RGB domain, using the Green channel for comparison is sufficient.  But Pi also supports YUV output.  The Y channel (luminance) actually is the brightness of each pixel.  Pi's YUV format is YUV420 and the first 2/3 of the file contains the Y data.

(d) if the number of pixels with change in Y (luminance) is greater than a limit, then this photo will be uploaded to Google Drive

(e) the photo will be converted to JPEG before the upload.  I use Imagemagick's convert command to do the job.  Remark: although I take my still picture at maximum resolution 3280x2464, because of the padding (horizontal: multiples of 32, vertical: multiples of 16), the resultant YUV file is of resolution of 3296x2464.  Since YUV file has no header to indicate the information, I need to specify the figure in the Imagemagick's convert command.

However, I find the major challenge is how to specify limit in step (d).  Therefore I conduct a data analysis of sensitivity of different values of change of Y.


As shown in the above graph, the bottom group of lines are those image with no motion detection (the variation is due to background noise).  The upper group of lines (with lighter colour) are those image with motion detection.  Finally I choose the following:
  • Change of Y: 50
  • Count: 50
However, after running for several days, I find that the camera is too sensitive that it trigger the capture even though I saw there is no noticeable object movement on the image.  Of course I have tried to adjust the above detection threshold using trial-and-error.  But as you know, I am only struggling between the dilemma of false positive and false negative scenario.  If I decrease the sensitivity significantly , then I may miss a capture if there is real object movement.

Finally I find the false detection scenarios are mainly due to too reasons:
  • overall ambient background brightness change due to sunshine (although it is a indoor environment)
  • there a portion of screen due to a white window curtain, which has a high value of Y and its changes of Y will affect the overall counter significantly
My original logic is to just look into a single point of "Change of Y", assuming that it is on a global applicable trend.  But it is not necessarily true.  Therefore to emphasize the object detection, I adopt a an accumulative approach, by counting the number of pixels with changes greater than a value.  For the second issue, my original logic use absolute logic and therefore a pixel changing from Y=1 to Y=11 has the same effect with another pixel changing from Y=245 to Y=255.  But from a subjective point, I think a relative change is more appropriate.

The following is effect after the change:


After the adjustment,, it can be observed that:

  1. the vertical axis interception is always 8121344, which is the total number of pixel of the image
  2. the lines of the background image (those in lighter color) are nearly straight line (with vertical axis in log scale)
  3. the lines of the image with motion (those in darker color) have a more horizontal line segment

I then choose the following criteria:
  • Relative Change of Y: 100
  • Accumulative count of pixels: 10000
Finally about the details of implementation.  I have only coded two programs.  The first is a C program called yuv_ardiff (viz. yuv's accumulative and relative diff) for step (c) above. [Remark: I am still learning python].  The second is a bash script will implement the whole logic.
The following are the source codes:

/***********
File        : yuv_ardiff.c
Description : To compare the Y space of two yuv files for motion detection
              Accumulative Relative Diff
Usage       : yuv_ardiff file1.yuv file2.yuv
Modification History
2017-08-01  Initial version
2017-08-06  Change counter to accumulative
2017-08-08  Use Relative ratio
*/

#include <stdio.h>
#include <stdlib.h>
#include <sys/stat.h>

int main (int argc, char **argv)
{
struct stat st;
int file1_size, file2_size;
int y_size;
int i;
FILE *fp1;
FILE *fp2;
unsigned char byte1, byte2;
int diff, sum, rdiff;;
int count[256];

if (argc != 3) {
  printf ("Usage: %s file1.yuv file2.yuv\n", argv[0]);
  return 0;
  }


if (stat(argv[1], &st) == -1) {
  printf ("Error: Cannot get the file size of %s\n", argv[1]);
  return 0;
  }
file1_size = st.st_size;
/* printf ("%d\n", file1_size); */

if (stat(argv[2], &st) == -1) {
  printf ("Error: Cannot get the file size of %s\n", argv[2]);
  return 0;
  }
file2_size = st.st_size;
/* printf ("%d\n", file2_size); */

if (file1_size != file2_size) {
  printf ("Error: File size of %s (%d) is not equal to %s (%d)\n", argv[1], file1_size, argv[2], file2_size);
  return 0;
  }

/* The first 2/3 are Y, next 1/6 is U and last 1/6 is V */
if ((file1_size % (3*16*16)) != 0) { /* actual is 1.5 * 32 * 16 */
  printf ("Error: File size (%d) should be multiple of 1.5*32*16\n", file1_size);
  return 0;
  }


fp1 = fopen (argv[1], "r");
if (fp1 == NULL) {
  printf ("Error: Cannot open file (%s)\n", argv[1]);
  return 0;
  }

fp2 = fopen (argv[2], "r");
if (fp2 == NULL) {
  printf ("Error: Cannot open file (%s)\n", argv[2]);
  return 0;
  }

y_size = file1_size * 2 / 3;
/* printf ("y_size = %d\n", y_size); */
for (i=0; i<256; i++)
  count[i] = 0;

for (i=0; i< y_size; i++) {
  if (fread (&byte1, 1, 1, fp1) != 1) {
    printf ("Error: Cannot read byte from (%s)\n", argv[1]);
    return 0;
    }
  if (fread (&byte2, 1, 1, fp2) != 1) {
    printf ("Error: Cannot read byte from (%s)\n", argv[2]);
    return 0;
    }

  diff = abs (byte1 - byte2);
  sum = byte1 + byte2;

  if (sum > 0)
    rdiff = (diff * 256) / sum;
  else
    rdiff = 0;

  if (rdiff > 255) {
    printf ("Error: rdiff (%d) is greater than 255\n", rdiff);
    return 0;
    }

  (count[rdiff])++;

  } // for loop

fclose (fp1);
fclose (fp2);

for (i=254; i>=0; i--)
    count[i] += count[i+1];

for (i=0; i<256; i++)
  printf ("%d ", count[i]);
printf ("\n");

return 0;
} // main

=====================================================
#!/bin/bash
# File: pi_camera_motion.sh
cd /home/whc/motion
rm -f last.yuv
if [ -e current.yuv ]; then
mv current.yuv last.yuv
fi
DATE=`date +"%Y%m%d_%H%M%S"`
raspiyuv -n -h 2464 -w 3280 -o current.yuv
if [ -e last.yuv ]; then
yd=`/home/whc/bin/yuv_adiff last.yuv current.yuv`
echo ${DATE} ${yd} >> /home/whc/yuv_ardiff.log
diff_count=`echo ${yd} | awk '{print \$101}'`
if [ "${diff_count}" -gt "10000" ]; then
convert -size "3296x2464" -depth 8 -sampling-factor "4:2:0" yuv:current.yuv pi_photo_${DATE}.jpg
/home/whc/gdrive-linux-rpi upload --parent xxxxxxxxxxxxxxxxxxxxxxxxxx pi_photo_${DATE}.jpg
fi
fi

2017-07-26

Take periodic photos using Pi camera and upload to Google Drive


Taking photos using the Pi camera is easy.  But how to allow remote access of the photo is a headache.  I do not want to Port Forwarding in my router (especially on SSH ports) because I think my Pi is not yet appropriately hardened.  I decide to upload the photos to the cloud.

Google has well-documented API for the Google Drive access.  In particular, I love Petter Rasmussen's gdrive, which is a CLI (command-line-interface) client for many Operating Systems because it is a static binary which does not need external libraries.

I have tried the Windows 64 bit build and the Raspberry Pi build and it works.  For the Windows build, I even try it behind the proxy server of my company and it works after I set up the http_proxy environment variable.

The github page of the gdrive already provides extensive documentation (with examples) and it is easy to adopt.  The following are my major usage:

(1) Initial setup

gdrive about

gdrive will print out a URL.  Using browser to launch the URL and enter the account password, Google will print out a verification code.  I will enter the verification code to the CLI.

There is documentation on Service Account, which is said to make server-to-Google access with password-less access.  But I find that even using the verification code approach, I find gdrive can refresh the token file automatically.  In other words, I only need to input the verification code once.  Therefore I finally do not bother to set up a Service Account.

(2) List File details

gdrive list --query "name = 'file_name_or_folder_name' "

C:\PortableApps\gdrive>gdrive-windows-x64.exe list --query "name = 'PI_PHOTO_00.jpg' "
Id                             Name              Type   Size     Created
xxxxxxxxxxxxxxxxxxxxxxxxxxxx   PI_PHOTO_00.jpg   bin    4.8 MB   2017-07-26 10:00:16

C:\PortableApps\gdrive>gdrive-windows-x64.exe list --query "name = 'pi-photos' "
Id                             Name        Type   Size   Created
xxxxxxxxxxxxxxxxxxxxxxxxxxxx   pi-photos   dir           2017-07-21 19:50:23

(3) List Files inside a folder

gdrive list --query " 'Parent_Folder_Id' in parents"

C:\PortableApps\gdrive>gdrive-windows-x64.exe list --query " '0Bzo1pJKfp9QEdVZFdVV2RTV2RVE' in parents "
Id                             Name              Type   Size     Created
xxxxxxxxxxxxxxxxxxxxxxxxxxxx   PI_PHOTO_35.jpg   bin    4.8 MB   2017-07-26 10:35:12
xxxxxxxxxxxxxxxxxxxxxxxxxxxx   PI_PHOTO_30.jpg   bin    4.7 MB   2017-07-26 10:30:12

(4) Upload File to specified folder

gdrive --parent Parent_Folder_Id Upload_Filename

(5) Delete File

gdrive delete  File_Id

I then start to code my bash script (which will be run by cron periodically) to take photo and then upload the photo.  I use the minute digits to name my photo filename and originally thought that this nomenclature can automatically recycle my photo copies without an explicit housekeeping job.  But I am wrong.  I find Google Drive allow multiple copies of the same filename (even not using the versioning feature) and these multiple copies will be assigned with different File-Id.

Worst still I find gdrive has no direct command to delete a file (or files) by filename.  I need to first list the File_id by the inputted filename and then delete them (if more than one) one-by-one.  The logic is:

gdrive list --no-header --query "name = 'Filename' " | awk '{print $1}' | xargs -n 1 gdrive delete

The xargs command is to ensure the gdrive is executed one-by-one

The following is my script:

#!/bin/bash
# use 00-59 minutes for filename recycling
DATE_MM=$(date +"%M")
cd  /home/pi/photos
raspistill -n -o PI_PHOTO_${DATE_MM}.jpg
# delete duplicated copies at Google drive
/home/pi/gdrive-linux-rpi list --no-header --query "name = 'PI_PHOTO_${DATE_MM}.jpg'" | awk '{print $1}' | xargs -n 1 /home/pi/gdrive-linux-rpi delete
# upload to pi_photos folder at Google Drive
/home/pi/gdrive-linux-rpi upload --parent xxxxxxxxxxxxxxxxxxxxxxxxxxxx --delete PI_PHOTO_${DATE_MM}.jpg

2016-01-07

Using U3 Flash Drive for CDROM emulation


I have an old U3 flash drive, which has only 1G capacity. This kind of a device can mount two drives simultaneously - one is a conventional flash drive (read/write) and one is a CDROM drive (read-only). Usually users does not care the CDROM partition and sometimes even remove it totally to spare more space from the conventional partition.

However, recently triggered by a corporate customer's site requirement that conventional flash drive is disabled but CDROM ia allowed (thanks to its read-only feature), I start to think whether I can re-use my old U3 drive for that purpose.

The first step is to create an ISO file, which should be a well-known idea if you have ever burned a disk. I choose to use InfraRecorder, because it has no embedded commercial ad and has a portable version to save the installation effort. The following screen shots illustrate the steps to build the ISO file.


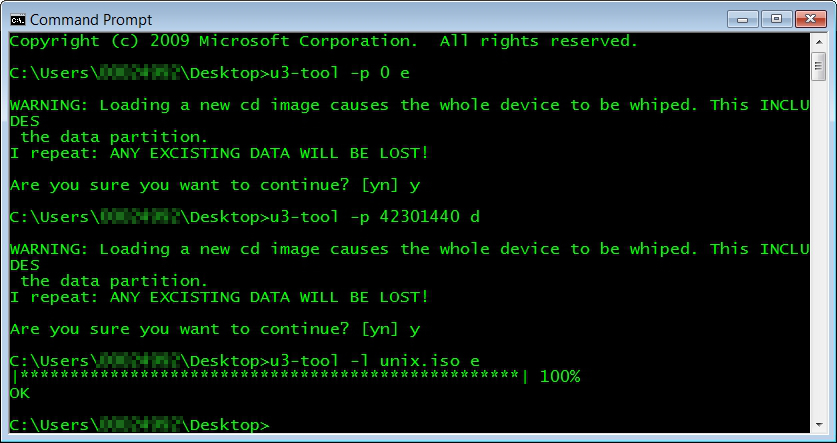
Then I download u3tool from SOURCEFORGE.NET. It is a open source tool to manipulate the U3 disk and I find it also work properly in my 64 bit Windows environment as well. The steps are simple:

(i) create the CDROM partition
u3-tool -p <size-of-iso-file> <driver letter o u3-cdrom-without-colon>
e.g. u3-tool -p 42301440 d

(ii) load the iso file
u3-tool -l <iso-filename>  <driver letter u3-cdrom-without-colon>
e.g. u3-tool -l unix.iso e


Then this CD Drive is shown in Windows Explorer as follows:


2015-09-24

Using openssl to test two way SSL connectivity

In my previous post Building a two way https web service server using Java, I said I used openssl to do the web service server testing.

In fact, before choosing openssl, I have tried other methods like curl, various Chrome extensions.  But finally I stick to openssl because of its flexibility and availability of low level output to facilitate my debugging.

In fact the script is as simple as follows:

openssl s_client -connect localhost:8000 -cert client.pem -key key.pem -CApath . -CAfile ca.pem -showcerts -debug -msg -state -crlf -ign_eof <<EOF
POST /app HTTP/1.1
hostname: localhost
Content-Type: application/x-www-form-urlencoded
Content-Length: XXX

<?xml version='1.0'?><Envelope xmlns='http://schemas.xmlsoap.org/soap/envelope/' xmlns:op='http://schemas.xyz.com/svc' xmlns:ems='http://schemas.xyz.com/ems'><Header>Header_Text</Header><Body><op:AddPbs><ems:ChannelAcctId><ems:ChannelId>06</ems:ChannelId><ems:AcctId>1234567</ems:AcctId></ems:ChannelAcctId></op:AddPbs></Body></Envelope>

EOF

Let me explain each parameter one by one:

s_client: it is the SSL/TLS client program of openssl suite
connect: it designates the web service connection details (IP address and port)
cert: it specifies the self (client) certificate to present to the host
key: it specifies the private key file signing the client certificate
CApath: it designates the folder containing the certificate chain(s)
CAfile: it designates the "trusted" CA which signs the server certificate
showcerts: it shows the whole server certificate chain
debug: it is a treasure of openssl
msg: ditto
state: ditto
crlf: in Unix, the line delimiter is LF only.  This switch will cause the content to be transmitted with CR+LF instead (but please note the Content-Length has to be modified accordingly)
ign_eof: I originally omitted this switch.  But I find it is needed because otherwise the connection is closed too early by openssl before the server can send  the response back.


Building a two way https web service server using Java


I have the following requirements:
  • to build a multi-thread http server serving inbound web service requests via POST
  • the request is not conventional SOAP but is still XML-based
  • both client and server authentication (certificate based) is needed (riding not https)

 After some googling I found that Java provides a convenient framework to deliver this capability (as in Meisch's article "Java Webservice using HTTPS part 2")

The major classes used is:
  1. com.sun.net.httpserver.HttpsServer (abstract class); and
  2. com.sun.net.httpserver.HttpHandler (interface)
As HttpsServer is an abstract class, it cannot be instantiated (creating an object via new operator).  My example class java_https_server is therefore to implement the HttpHandler interface and have a method CreateHttpServer to create an HttpsServer object via the static HttpsServer.create() method.

The logic of the program is as follows:
  1. inside the main method, after creating a dummy java_https_server object, invoke the CreateHttpServer method to create a HttpsServer object
  2. inside CreateHttpServer method, open a Java Key Store containing the web server's own certificate and the Trust Store containing the trusted client certificate (the latter is needed because I use two-way SSL).  An SSLContext object instance is linked to these two key stores.  Finally, a context (which I find useless because I cannot still associate different handler with different context) is created for the HttpsServer object.
  3. the main method continue to set up a shutdown hook to graceful termination handling
  4. since the java_https_server implements the HttpHandler interface, a handle() method is defined  This is the core running logic of the whole web service server. I have added many println statements to display the attributes of the http connection in my codes.
The source listing is as follows:

import java.io.FileInputStream;

import java.io.InputStream;
import java.io.OutputStream;
import java.io.IOException;
import java.io.File;
import java.io.FileInputStream;
import java.io.FileNotFoundException;
import com.sun.net.httpserver.HttpHandler;
import com.sun.net.httpserver.HttpsServer;
import com.sun.net.httpserver.HttpExchange;
import com.sun.net.httpserver.HttpsExchange;
import com.sun.net.httpserver.HttpsConfigurator;
import com.sun.net.httpserver.HttpsParameters;
import javax.net.ssl.KeyManagerFactory;
import javax.net.ssl.SSLParameters;
import javax.net.ssl.TrustManagerFactory;
import javax.net.ssl.SSLContext;
import java.security.KeyStore;
import java.net.URI;
import java.net.InetSocketAddress;

public class java_https_server implements HttpHandler {
private static final int HTTP_OK_STATUS = 200;
// ----------class property --------------
private String context = "/";
private int port = 8000;
private String keystorePasswordString = "password";
private String keystoreFile = "/full_path/keystore.jks";
private String truststorePasswordString = "password";
private String truststoreFile = "/full_path/truststore.jks";
// --------- Constructor -------------------
public java_https_server () {
  }
// --------------------------------------------
public HttpsServer CreateHttpServer(int port, String context) {
  HttpsServer httpServer;
  try {
    httpServer = HttpsServer.create(new InetSocketAddress(port), 0);
    SSLContext sslContext = SSLContext.getInstance("TLS");
    // server keystore
    char[] keystorePassword = keystorePasswordString.toCharArray();
    KeyStore ks = KeyStore.getInstance("JKS");
    ks.load (new FileInputStream(keystoreFile), keystorePassword);
    KeyManagerFactory kmf = KeyManagerFactory.getInstance("SunX509");
    kmf.init (ks, keystorePassword);
    // server truststore
    TrustManagerFactory tmf = TrustManagerFactory.getInstance("SunX509");
    char[] truststorePassword = truststorePasswordString.toCharArray();
    ks.load (new FileInputStream(truststoreFile), truststorePassword);
    tmf.init (ks);
    sslContext.init(kmf.getKeyManagers(), tmf.getTrustManagers(), null);
    // create an anonymous inner class HttpsConfigurator to require client certificate
    HttpsConfigurator configurator = new HttpsConfigurator(sslContext) {
      public void configure (HttpsParameters params) {
        SSLParameters sslParams = getSSLContext().getDefaultSSLParameters();
        sslParams.setNeedClientAuth(true);
        params.setSSLParameters(sslParams);
        }
      };
    httpServer.setHttpsConfigurator(configurator);
    //Create a new context for the given context and handler
    httpServer.createContext(context, this);
    //Create a default executor
    httpServer.setExecutor(null);
    }
  catch (Exception e) {
    e.printStackTrace();
    return null;
    }
  return httpServer;
  } // method CreateHttpServer
// --------------------------------------------
public void handle(HttpExchange t) throws IOException {
  URI uri = t.getRequestURI();
  String response;
  System.out.println ("LocalAddress: " + t.getLocalAddress().toString());
  System.out.println ("RemoteAddress: " + t.getRemoteAddress().toString());
  System.out.println ("URL is: " + uri.toString());
  System.out.println ("Method: " + t.getRequestMethod());
  System.out.println ("Client Certficate: " +
    ((HttpsExchange)t).getSSLSession().getPeerCertificateChain()[0].getSubjectDN());
  if (t.getRequestMethod().equals ("POST")) {
    InputStream is = t.getRequestBody();
    byte[] data = new byte[100000];
    int length = is.read(data);
    if (length == 100000)
      System.out.println ("Warning: the input buffer is FULL!");
    System.out.println ("Request Length: " + length);
    data = java.util.Arrays.copyOf(data, length); // trim the array to the correct size
    System.out.println ("Request Body:[" + new String(data) + "]");
    is.close();
    response = "Give your response here";
    }
  else {
    response = "Error";
    }
  //Set the response header status and length
  t.sendResponseHeaders(HTTP_OK_STATUS, response.getBytes().length);
  //Write the response string
  OutputStream os = t.getResponseBody();
  os.write(response.getBytes());
  os.close();
}
// --------------------------------------------
public static void main(String[] args) throws Exception {
  java_https_server server = new java_https_server();
  System.out.println("Use Ctrl-C (foreground) or \"kill -15 (background)\" to stop me");
  final HttpsServer httpServer = server.CreateHttpServer(server.port, server.context);
  Runtime.getRuntime().addShutdownHook(new Thread() {
    @Override
    public void run() {
      System.out.println("Stopping Server..");
      httpServer.stop(0);
      System.out.println("Server stopped");
      } // run()
    });
  httpServer.start(); // Start the server
  System.out.println("Server is started and listening on port "+ server.port);
  } // method main
} // class java_https_server

Some example runtime output is as follows:
$ java -cp . java_https_server
Use Ctrl-C (foreground) or "kill -15 (background)" to stop me
Server is started and listening on port 8000
LocalAddress: /127.0.0.1:8000
RemoteAddress: localhost/127.0.0.1:52204
URL is: /app
Method: POST
Client Certficate: CN=ccm010, OU=xxx, O=xxx, L=xxx, ST=xxx, C=HK
Request Length: 385
Request Body:[<?xml version='1.0'?><Envelope xmlns='http://schemas.xmlsoap.org/soap/envelope/' xmlns:op='http://schemas.xyz.com/svc' xmlns:ems='http://schemas.xyz.com/ems'><Header>Header_Text</Header><Body><op:AddPbs><ems:ChannelAcctId><ems:ChannelId>06</ems:ChannelId><ems:AcctId>1234567</ems:AcctId></ems:ChannelAcctId></op:AddPbs></Body></Envelope>]
Stopping Server..
Server stopped

I will cover how to test using openssl with client certificate in the next post.

Using openssl to test two way SSL connectivity


2015-06-30

Using libxml for XPath

With the proliferation of presentation of data using XML, I find parsing the data is not easy as more and more ingredients (like attributes, name spaces) are introduced.  Up to now, I still find using XPath syntax to represent XML nodes is the best because it simplifies the complicated data hierarchy structure into the conventional slash form, like:
/A/B/C
to select the C element in the XML
<A>
  <B>
    <C/>
  </B>
</A>
(example borrowed from https://en.wikipedia.org/wiki/XPath)

Although I have used Java's built-in XPath features previously, when I have a C project, I need to resort to external library for the job.  I finally choose libxml.  One of the headaches in libxml is its memory management because otherwise you will induce memory leakage easily.
This document describes my learning.

This source code of my example is xpath_demo.c and the full listing is included in another post (link).

Compilation
Most of the installation of libxml is at /usr/local, therefore the sample program xpath_demo.c is compiled with the following switches:
cc -o xpath_demo -L/usr/local/lib -R/usr/local/lib -lxml2 -I/usr/local/include/libxml2 xpath_demo.c

Program Structure
The program has only two functions, the main function (which includes most of the logic) and register_namespaces (which is copied from libxml site for the name space registration)

Program Usage
The simplest usage is:
xpath_demo xml_filename xpath_expression
If there is name space, then the usage will be:
xpath_demo xml_filename xpath_expression name_space_list

Pseudo Codes

Invoke libxml function
Input/Output
Outstanding Object
xmlParseFile
Input: xml filename
Output: xmlDocPtr
xmlDocPtr
xmlPathNewContext
Input: xmlDocPtr
Output: xmlXPathContextPtr
xmlDocPtr
xmlXPathContextPtr
xmlXPathRegisterNs (only applicable for xml with namespace)
Input: xmlXPathContextPtr
namespace_prefix
namespace_URL

xmlXPathEvalExpression
Input: XPath_Expression,
xmlXPathContextPtr
Output: xmlXPathObjectPtr
xmlDocPtr
xmlXPathContextPtr
xmlXPathObjectPtr
xmlXPathFreeContext

xmlDocPtr
xmlXPathObjectPtr
Check if xmlXPathNodeSetIsEmpty
Input: xmlXPathObjectPtr->nodesetval

Retrieve the node:
xmlXPathObjectPtr ->nodesetval->nodeTab[0]


Retrieve the text of the node
xmlNodeGetContent
Input: xmlNode *
Output: xmlChar *
xmlDocPtr
xmlXPathObjectPtr
xmlChar * node_text
xmlFree (node_text)
xmlXPathFreeObject(xmlXPathObjectPtr)

xmlDocPtr
Final Clean up
xmlFreeDoc(xmlDocPtr);
xmlCleanupParser();

Nil

The "simplified" print out of various inputs are shown as follows:
cat data.xml
<?xml version='1.0'?>
<Envelope>
<Header>Header_Text</Header>
<Body attribute1='funny'>
<Field1>Value1</Field1>
<Field2>Value2</Field2>
</Body>
</Envelope>

xpath_demo error.xml /FIELD1
I/O warning : failed to load external entity "error.xml"
Error: Document not parsed successfully.

xpath_demo data.xml /Envelope/Body
node-text: "
Value1
Value2
"
Remark: According to the specification, the text of node includes all the text of its daughter nodes as well.

xpath_demo data.xml /Envelope/Body/Field1
node-text: "Value1"

xpath_demo data.xml /Envelope/Body/Field3
Empty

Cases with Name Space
Personally I do not like name space in XML because it is awkward.  Anway, libxml does support it, with an additional step to register the name space list.

An XML file (ns_data.xml) with name space is shown below:

<?xml version='1.0'?>
<Envelope xmlns:ns1='http://www.domain.com/ns/sample'>
<Header>Header_Text</Header>
<Body name='value'>
<ns1:Field1>Value1 in ns1</ns1:Field1>
<Field1>Value1 without NS<Field1>
</Body>
</Envelope>

A nameapace ns1 is defined in the root element <Envelope>.  You can see there are two tags with name Field1, one of which with name space ns1.  They are can accessed separately as follows:

xpath_demo ns_data.xml /Envelope/Body/ns1:Field1 ns1=http://www.domain.com/ns/sample
node-text: "Value1 in ns1"

xpath_demo ns_data.xml /Envelope/Body/Field1 ns1=http://www.domain.com/ns/sample

node-text: "Value1 without NS"

xpath_demo.c

/*
File : xpath_demo.c
Description: A demo C program to print the text of a node from a xpath expression
Usage: xpath_demo.c xml_file xpath_expression
Dependence: libxml2
How to make:
cc -o xpath_demo -L/usr/local/lib -R/usr/local/lib -lxml2 -I/usr/local/include/libxml2 xpath_demo.c
*/

#include <libxml/parser.h>
#include <libxml/xpath.h>
#include <libxml/xpathInternals.h>   /* for function xmlXPathRegisterNs */
#include <assert.h>

/* Function Prototype */
int  register_namespaces(xmlXPathContextPtr xpathCtx, const xmlChar* nsList);

/* ===================================================================== */
int main(int argc, char **argv) {

xmlDocPtr doc;
/* xmlNodeSetPtr nodeset; */
xmlXPathObjectPtr result;
xmlNode *node;
xmlChar *node_text;
xmlXPathContextPtr context;
char *filename;
xmlChar *xpath_expression;
xmlChar *nsList;

if ((argc != 3) && (argc != 4)) {
  fprintf(stderr, "Usage: %s xml_file xpath_expression  [<known-ns-list>]\n", argv[0]);
  fprintf(stderr, "where <known-ns-list> is a list of known namespaces\n");
  fprintf(stderr, "in \"<prefix1>=<href1> <prefix2>=href2> ...\" format\n");
  return(1);
  }
filename = argv[1];
xpath_expression = (xmlChar*) argv[2];

fprintf (stderr, "DEBUG: LIBXML_VERSION is " LIBXML_VERSION_STRING "\n");

doc = xmlParseFile(filename);
if (doc == NULL ) {
  fprintf(stderr, "Error: Document not parsed successfully.\n");
  xmlCleanupParser();
  return 1;
  }

context = xmlXPathNewContext(doc);
if (context == NULL) {
  fprintf(stderr, "Error in xmlXPathNewContext\n");
  xmlFreeDoc(doc);
  xmlCleanupParser();
  return 2;
  }

if (argc == 4) {
  nsList = (xmlChar*) argv[3];
  if (register_namespaces(context, nsList) < 0) {
    fprintf(stderr,"Error: failed to register namespaces list \"%s\"\n", nsList);
    xmlXPathFreeContext(context);
    xmlFreeDoc(doc);
    xmlCleanupParser();
    return 3;
    }
  }
result = xmlXPathEvalExpression(xpath_expression, context);
xmlXPathFreeContext (context);
if (result == NULL) {
  fprintf(stderr, "Error in xmlXPathEvalExpression\n");
  xmlFreeDoc(doc);
  xmlCleanupParser();
  return 4;
  }

/*
xmlXPathEvalExpression() call returns a set of ALL the nodes that match the expression
We are only interested in the first node returned
*/

if (xmlXPathNodeSetIsEmpty(result->nodesetval)) {
  printf ("Empty\n");
  xmlXPathFreeObject(result);
  xmlFreeDoc(doc);
  xmlCleanupParser();
  return 5;
  }

/* Retrieve the data */
node = result->nodesetval->nodeTab[0];
node_text = xmlNodeGetContent(node);
/* xmlNodeGetContent retrieves the text values of all children too.  This is correct */

fprintf (stderr, "DEBUG: node-type: %d node-name: %s\n" ,node->type, node->name);
xmlAttr *attr = node->properties;
while ( attr ) {
  fprintf (stderr, "DEBUG: attribute-name:%s attribute-value:%s\n" , attr->name, attr->children->content);
  attr = attr->next;
  } /* while */
printf ("node-text: \"%s\"\n", node_text);
xmlFree (node_text);
xmlXPathFreeObject(result);

/* Final clean up */
xmlFreeDoc(doc);
xmlCleanupParser();
return (0);
} /* main */

/**************************************************************************************/
/* The following fucnction is extracted from http://www.xmlsoft.org/examples/xpath1.c */
/**************************************************************************************/

/**
 * register_namespaces:
 * @xpathCtx:           the pointer to an XPath context.
 * @nsList:             the list of known namespaces in
 *                      "<prefix1>=<href1> <prefix2>=href2> ..." format.
 *
 * Registers namespaces from @nsList in @xpathCtx.
 *
 * Returns 0 on success and a negative value otherwise.
 */
int
register_namespaces(xmlXPathContextPtr xpathCtx, const xmlChar* nsList) {
    xmlChar* nsListDup;
    xmlChar* prefix;
    xmlChar* href;
    xmlChar* next;

    assert(xpathCtx);
    assert(nsList);

    nsListDup = xmlStrdup(nsList);
    if(nsListDup == NULL) {
        fprintf(stderr, "Error: unable to strdup namespaces list\n");
        return(-1);
    }

    next = nsListDup;
    while(next != NULL) {
        /* skip spaces */
        while((*next) == ' ') next++;
        if((*next) == '\0') break;

        /* find prefix */
        prefix = next;
        next = (xmlChar*)xmlStrchr(next, '=');
        if(next == NULL) {
            fprintf(stderr,"Error: invalid namespaces list format\n");
            xmlFree(nsListDup);
            return(-1);
        }
        *(next++) = '\0';

        /* find href */
        href = next;
        next = (xmlChar*)xmlStrchr(next, ' ');
        if(next != NULL) {
            *(next++) = '\0';
        }
        /* do register namespace */
        if(xmlXPathRegisterNs(xpathCtx, prefix, href) != 0) {
            fprintf(stderr,"Error: unable to register NS with prefix=\"%s\" and href=\"%s\"\n", prefix, href);
            xmlFree(nsListDup);
            return(-1);
        }
    }

    xmlFree(nsListDup);
    return(0);
}

2014-11-06

太古坊的「真我」Retake


2009年那時相機的Miniature Fake效果(或稱Tilt-shift Fake)還未普及,我是將用傻瓜機拍的相片用電腦Gimp軟件加工來做散景,以滿足未有大光圈鏡頭拍不到淺景深相片的心願,其中一輯是在太古坊的拍的「真我」(連結)。

早前終於在二手市場買了支CCTV鏡頭,是Fujian 35mm F/1.7,散景效果不錯,今天再經過太古坊,便用它再拍一次比較比較。